This post also appeared on the Ludum Dare blog, but I figured I share it here as well.
Since I am planning to record a timelapse of my gamedev for the upcoming LD#33, I thought it would be nice to take a series of screenshots for creating a nice timelapse animation afterwards. I went ahead and did some testing and ran into problems with multi-monitor setups, especially when one monitor has a different pixel density (dpi) than the other(s). This little post is my solution to the problem and provide every Windows user (even on single-screen setups) with a free solution to take screenshots at a set interval.
The Problem
While I tried different tools for the task at hand (screen recording via BandiCam, automated screenshot taking with boxcutter or cmdcapture, and other freeware), none was perfect or even up to the task at hand. The problem is that I am running a very uncommon setup of monitors and resolutions:
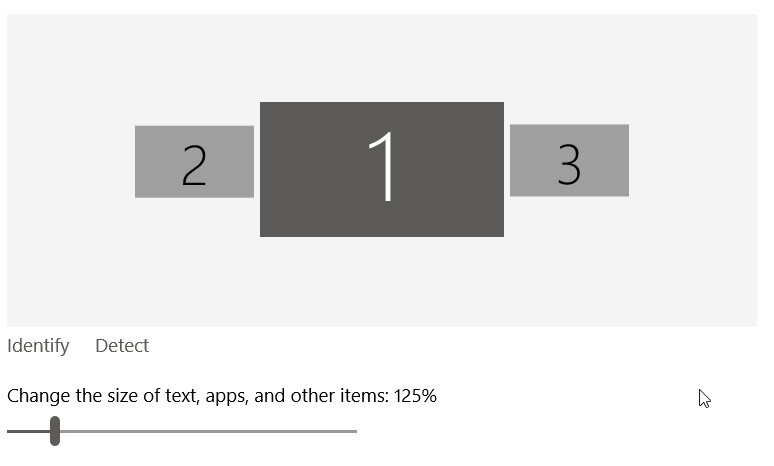
Monitor 1 is an UHD display with a resolution of 3840×2160px while monitors 2 and 3 are each 1920×1200px. What complicates things further, is that the UI on screen 1 is scaled up to 125% by Windows which many programs have troubles with. Did I mention I am also running Windows 10?
I spent the evening trying different programs and approaches and came up with a solid solution which doesn’t even cost you anything!
The Solution
I found the incredibly versatile command-line tool NirCmd to be perfect for taking a screenshot of my entire desktop — yet not without tweaking. This is how I got it to work:
When you run nircmd.exe from a Windows command line, you can use it to perform a plethora of tasks, not only taking screenshots, but also turning off your monitor, waiting for programs to close, and a lot more. The option I was most interested is savescreenshotfull to save the entire screen which I thought would do the trick. Well, not quite: The bottom-part of my big screen was cut off while the screenshot was padded with a lot of black on the right:
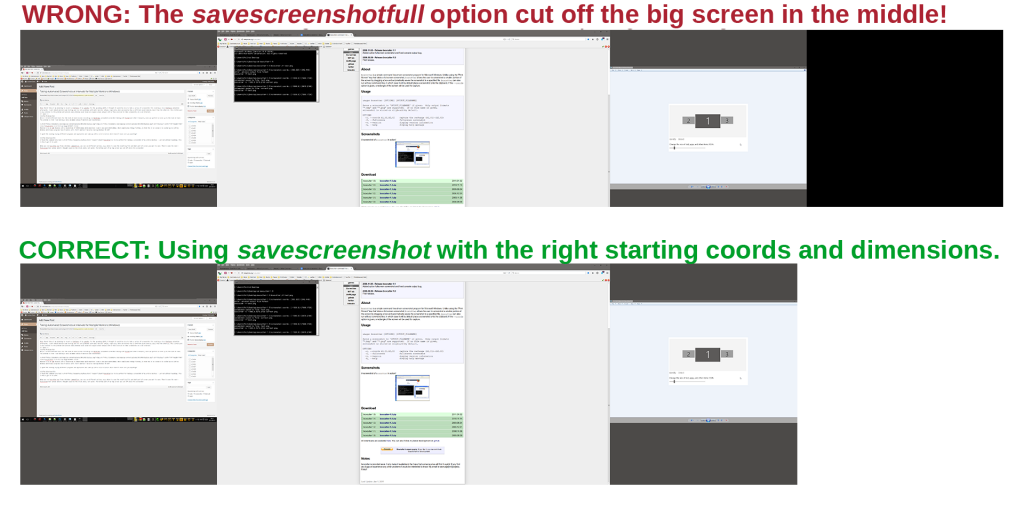
The trick is not to rely on the savescreenshotfull option for it produces erroneous results, instead use savescreenshot which allows you to specify the coordinates and dimensions of the capture rectangle. Getting the right coorddinates was a bit tricky. Let’s refer to my monitor setup again:
Starting from 0,0 only would capture my screens 1 and 3, because monitor 1 is set as my “primary monitor” and this means that Windows’ coordinate system treats it as origin. Instead I had to use the starting coordinates of -1920,0 and — presto! — that worked. Calculating the width and height of the rectangle was a matter of basic arithmetic. This was the command that worked for me:
nircmd savescreenshot file.png -1920 0 7680 2160
Great! But how about taking a screenshot at a given interval? Glad you asked:
Taking Screenshots at Intervals
Did I mention that NirCmd has a plethora of options? It not only allows to run one option, no, you can run multiple. The attribute cmdwait followed by an amount of milliseconds defers the following command by the given delay. Neat! In order to wait 5 seconds before taking a screenshot, just run
nircmd cmdwait 5000 savescreenshot file.png -1920 0 7680 2160
The only thing left to do was to run the command over and over until I wanted it to stop. NirCmd even has an option for that (loop that is), but you can’t say “run this one in an infinite loop”, so I thought I write a little batch-script for this which also lets you define the filename and saving location of the created screenshots. You know, for convenience sake 🙂
In the same folder where nircmd.exe resides, create a new text file and title it something like “Take screenshot at interval.txt” and copy/paste the following block of code. Don’t worry, I’ll run you through it below.
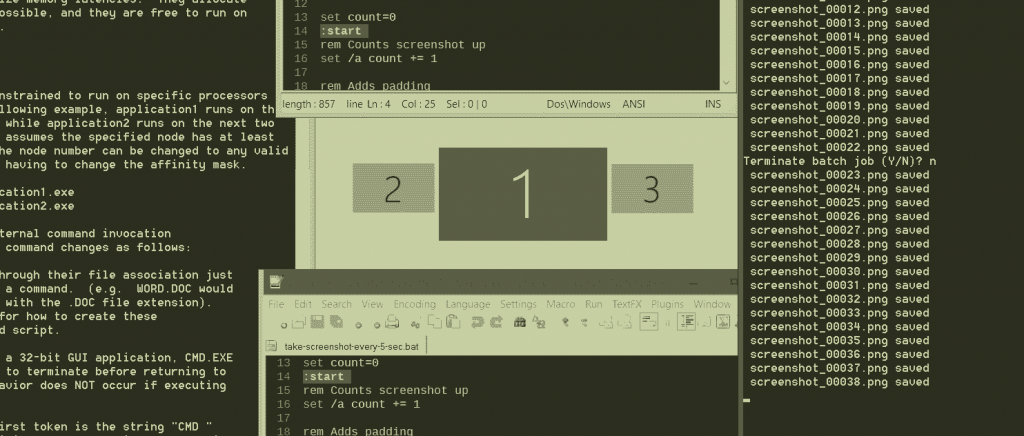
@echo off
rem  Set your custom options in the following four lines:
set       prefix=screenshot_
set     interval=5
set    extension=png
set  destination=G:\temp\screenshot\

set count=0
:start
rem Counts screenshot up
set /a count += 1

rem Adds padding
if %count% LEQ 9999 (set padding=0)
if %count% LEQ 999 (set padding=00)
if %count% LEQ 99 (set padding=000)
if %count% LEQ 9 (set padding=0000)
if %count% GTR 9999 (set padding=)

:screenshot
set filename=%prefix%%padding%%count%.%extension%

rem Actual command to take screenshot
nircmd.exe cmdwait %interval%000 savescreenshot "%destination%%filename%" -1920 0 7680 2160
echo.%filename% saved

goto start
It’s pretty straight forward but since I’m in a nice mood, I’ll explain it to those of you who never really worked with batch scripts:
- @ECHO OFF just means not to print every command from the batch file and only the results.
- Each line starting with rem is an inline comment
- With set you can define variables and strings. Here, just change the values to your liking. By default, the resulting screenshot will be titled to look like “screenshot_0123.png” and saved to “G:\temp\screenshot\”, but you can put in whatever you like. The interval is set to 5 which means to wait 5 seconds before executing the screenshot command.
- A line starting with a colon, :, is a label. I use it as jump-points for the goto-command and to structure the code a little.
- set /a count += 1 adds 1 to the value of the variable “count”. This is used to number the screenshots sequentially
- The IF %count% LEQ 9999 (set padding=0) line is a simple IF statement. If the variable “count” is less-or-equal (that’s the “LEQ”) to 9999, then the variable called “padding” will be set to “0”, and so on. The reason for this is to always have the serial number in the file name amount to six digits for sorting reasons.
- In the :screenshot section the final file name is constructed from the prefix, the padding, the current serial number (“count”) and the file extension.
- And finally, I call NirCmd with my settings from above. If you don’t have a multi-monitor setup (or one that doesn’t get cut off), you can just write “savescreenshotfull” instead of “savescreenshot” and delete the numbers at the end.
- %interval%000 looks odd, doesn’t it? Because the cmdwait option expects milliseconds as parameter, I just add three zeroes after the interval-variable and “5” becomes “5000”
- Then, the echo. command just outputs the current file name in the command window so we know that everything is working like it should.
- And last but not least a goto command instructs the script to run again from the :start label. This means that the script will run until closed.
Now simply change the file extension of the text file to .bat and double click it. This will run the script and it begins taking screenshots.
Great, but how do I close it?
Just click the X on the window’s top corner or hit Ctrl+C to pause the script.
Closing Notes
What’s cool is that this doesn’t cost any money and the memory footprint is very low, nircmd.exe uses around 1.5 megs of RAM on my system while running. But note that depending on how much is going on on your screen, the resulting image-sequence of screenshots can amount to several gigabytes! So make sure that you save them on a drive where you have enough space left.
I hope anybody still is reading because it took me quite some time to type this up! Happy jamming and all the best for the upcoming LD#33!